Load TensorFlow Models Using OpenCV
 Image from Google image search
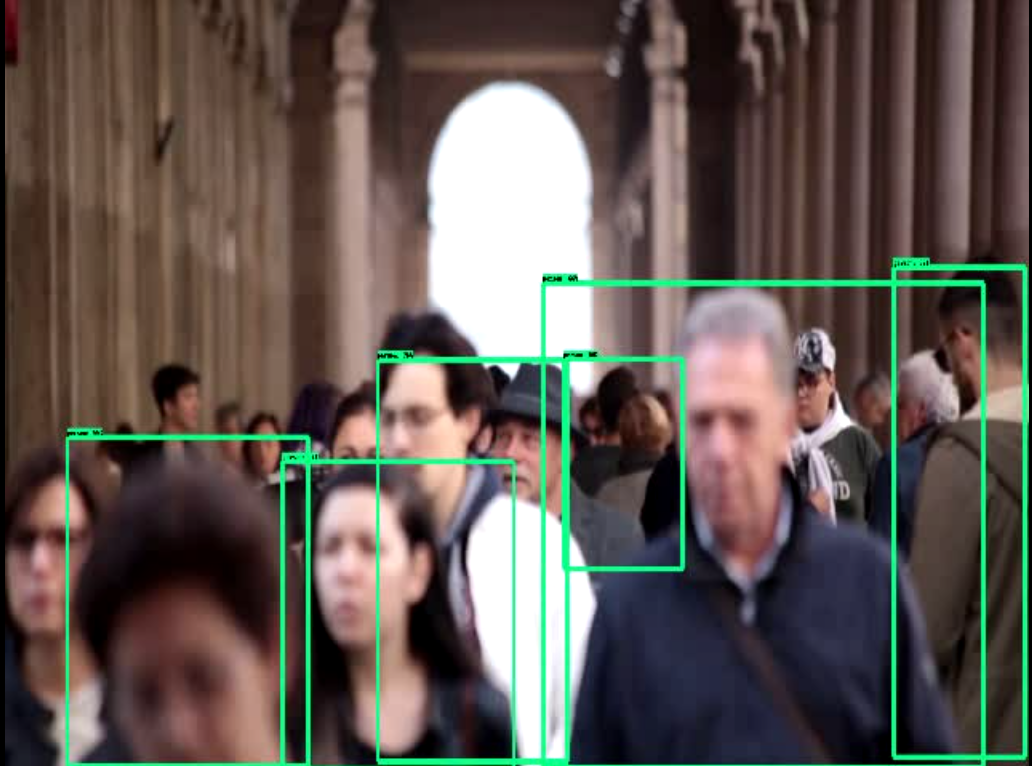
Background :
It is always a daunting task with Tensorflow sessions and standard handling of a typical Tensorflow model when you want to run inference. However, if you are an experienced developer you may also quickly go through these steps because you are already aware about how to use Tensorflow to run inference on your model.
Most of the times we use some image pre-processing over the input image before passing it to your model built using Tensorflow. This pre-processing is mostly handled using OpenCV or such libraries or something like imutils for basic handling of images or video frames.
How about using OpenCV itself to load and run inference on your Tensorflow models, this is what I encountered very recently when I was stuck with a problem while using Tensorflow sessions, although being straightforward these Tensorflow sessions can sometimes take some little extra time to manage while doing inference. OpenCV handles it quite well and we are going to discuss it here in this blog post.
Pre-requisites :
You have been from
import cv2
import tensorflow as tf
To
results : person - 84%
Loading TF models using OpenCV :
The Opencv’s DNN module hosts a variety of great features when it comes to utilizing the library for neural networks.
One such important addition is Tensorflow’s object detection API using OpenCV’s dnn module.
If you have not installed OpenCV with it’s extra modules also called as OpenCV Contrib modules you can read one of my previous post on how to do that here.
Getting started :
Jump right to the end if you are looking to download the codes.
For this tutorial we require the Tensorflow models in a specific manner, needn’t worry because they are quite easily available through the TF model zoo.
The result of training a model using Tensorflow is a binary file with extension .pb which contains both topology and weights of trained network. You may download one of them from
Model Zoo,
Once you have the .pb file you will also need a .pbtxt file which is an extra configuration file required which you can find
here for many pretrained models and below you can find a good list from the OpenCV wiki to help you get started faster.
| Model Version | Version | Weights(.pb) | prototxt(.pbtxt) |
|---|---|---|---|
| MobileNet-SSD v1 | 2017_11_17 | weights | config |
| MobileNet-SSD v1 PPN | 2018_07_03 | weights | config |
| MobileNet-SSD v2 | 2018_03_29 | weights | config |
| Inception-SSD v2 | 2017_11_17 | weights | config |
| MobileNet-SSD v3 (see #16760) | 2020_01_14 | weights | config |
| Faster-RCNN Inception v2 | 2018_01_28 | weights | config |
| Faster-RCNN ResNet-50 | 2018_01_28 | weights | config |
| Mask-RCNN Inception v2 | 2018_01_28 | weights | config |
| EfficientDet-D0 | (see #17384) | weights | config |
Furthermore, if you would like to convert your own models you can refer the following scripts for a better context to how to get the required files.
- tf_text_graph_ssd.py
- tf_text_graph_common.py
- tf_text_graph_faster_rcnn.py
- tf_text_graph_mask_rcnn.py
You can pass the configuration file which was used for training to get your pbtxt file to determine the hyperparameters.
python tf_text_graph_faster_rcnn.py --input /path/to/model.pb --config /path/to/example.config --output /path/to/graph.pbtxt
Now that we have the required files , let us dive right into the code.
THe module we need is the cv2's dnn module readNetFromTensorflow which accepts .pb and .pbtxt as arguments.
According to opencv docs these arguments are defined as :
model - path to the .pb file with binary protobuf description of the network architecture
config - path to the .pbtxt file that contains text graph definition in protobuf format. Resulting Net object is built by text graph using weights from a binary one that let us make it more flexible.
To then load your model you can do
Net = cv2.dnn.readNetFromTensorflow(PATH_TO_CKPT, PATH_TO_PBTXT)
Once you have laoded your model with config you then need to pass your image/frame to the net to perform inference.
Net.setInput(cv2.dnn.blobFromImage(img, size=(300, 300), swapRB=True, crop=False))
detections = Net.forward()
Here blobFromImage creates 4-dimensional blob from image. Optionally it also resizes and crops image from center, subtract mean values, scales values by scalefactor, swap Blue and Red channels.
The parameters can be defined as shown in the above example
image - input image (with 1-, 3- or 4-channels).
size - spatial size for output image
mean - scalar with mean values which are subtracted from channels. Values are intended to be in (mean-R, mean-G, mean-B) order if image has BGR ordering and swapRB is true.
scalefactor - multiplier for image values.
swapRB - flag which indicates that swap first and last channels in 3-channel image is necessary.
crop - flag which indicates whether image will be cropped after resize or not
ddepth - Depth of output blob. Choose CV_32F or CV_8U.
Whereas the Net.forward runs forward pass to compute output of layer with name outputName.
That’s it those are the changes, now you just need to loop over the detections with a desired accuracy metric and get your final result as you would otherwise get by using Tensorflow directly( bounding boxes ).
You now need to put all the pieces together to getting started on this:
To run inference on an image you can use the following script :
Well you are now set.
You can expect output similar to this :
Let’s just not stop right here, how about processing videos for a bit more addition to this along with the showing labels over those bounding boxes. This post has you covered, you can use the following code to achieve this:
You can also run your model using also the python script from the OpenCV documentation as given below:
In a jiffy :
We dived into loading tensorflow models using OpenCV, various definitions of the functions used for doing the Tensorflow operations in OpenCV itself and some examples related to it.
I believe using Tensorflow directly is still also the most effective way you can use the trained or pre-trained models to run inference on , however for ease, simplicity you can also try this method as it also leverages the same Tensorflow Object Detection API.
Hoping this was a great learning curve as it was for me.
This can also be used to create API’s to your Opencv and Tensorflow based application.
OpenCV can also be used with other popular deep learning frameworks and libraries like Torch, Caffe, ONNX and also supports many deep learning layers used for training your own neural networks alongwith also seamlessely integrating them.
Download codes for this tutorial
References :
[1] OpenCV extra modules contrib - https://github.com/opencv/opencv_extra/tree/master/testdata/dnn
[2] Tensorflow : https://tensorflow.org
[3] Stack overflow : https://stackoverflow.com
[4] Tensorflow object detection API using OpenCV : https://github.com/opencv/opencv/wiki/TensorFlow-Object-Detection-API
[5] Jean’s blog - https://jeanvitor.com/tensorflow-object-detecion-opencv/
[6] Deep learning using OpenCV : https://github.com/opencv/opencv/wiki/Deep-Learning-in-OpenCV
[7] COCO dataset - http://cocodataset.org/#home
[8] Google Protobuf - https://developers.google.com/protocol-buffers/
[9] OpenCV Mask R-CNN sample - https://github.com/opencv/opencv/blob/master/samples/dnn/mask_rcnn.py
Ashwin Phadke
Computer Vision | Deep Learning
Ashwin has more than 1.2 years of professional and mentoring experience in deep learning, computer vision and NLP.